For my work at One Billion Stars, I teach people across Australia and around the world how to weave an 8 pointed star so that they can be part of a global community that is committed to ending all forms of violence.
At One Billion Stars you will also find a starter star weaving kit of 100 stars if you want to skip straight to weaving with colourful ribbon. It doesn’t matter what materials you use, as long as you have a great time!
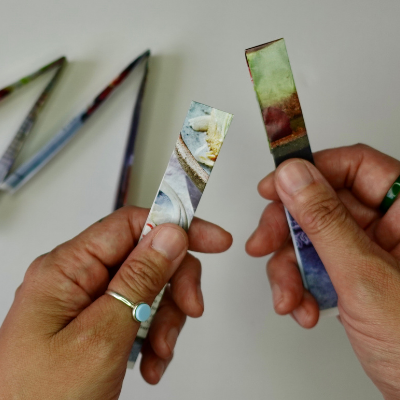
To weave a paper star you need 4 long narrow strands, about 2cm wide and 30cm long, of either paper, ribbon or a natural fibre like pandanus, flax or palm leaf. There are 3 steps to weaving a star, the first is to make the square body in the centre of the star. Step 2 is weaving the first 4 points and step 3 is flipping the star over to complete the last 4 points.
Preparing your paper strips to weave
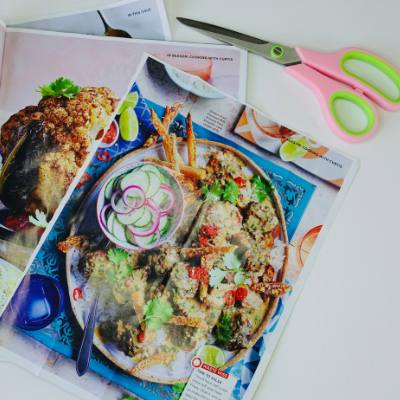
To get started, you will need a magazine and some scissors.
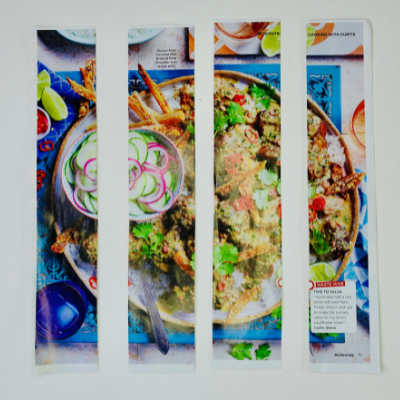
Carefully fold and cut into 4 lengths.
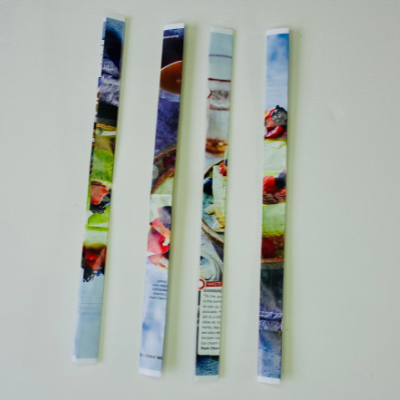
Fold each length into thirds
You will also need:
1 x A4 sheet of paper or a sheet from a magazine, carefully removed
1 x sharp craft scissors
Optional: If you’re using plain paper, you can use coloured pens to colour or draw patterns on your completed star. You can also decorate your finished woven star with stickers and designs.
Step 1: Fold your piece of paper in half, length wise and then half again. You should have 4 equal lengths.
Step 2: Cut along the folds so that you have 4 lengths. Set aside 2 of these lengths. This will be used later to make your second star.
Step 3: Fold each of your 2 lengths into half again and cut. You should now have 4 lengths. Fold each length into thirds so you have a strand with 3 layers of paper.
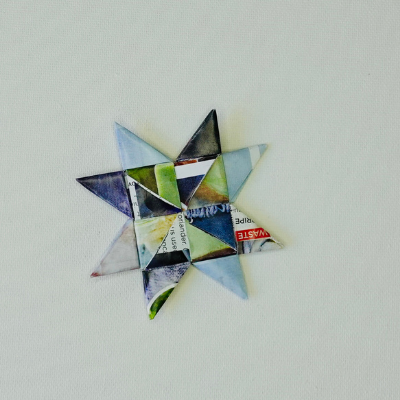
When complete, this paper star will measure 7cm x 7cm.
If you want to use tear ribbon, simply cut 4 x 45cm lengths of ribbon. A star woven using florist ribbon (33mm x 45cm) is about 12cm x 12cm.
Step by step instructions on how to weave a star.
Step 1 & 2. Fold your strands in half.
Step 1 & 2. Fold your strands in half.
Step 4: Wrap the 3rd strand around the 2nd one.
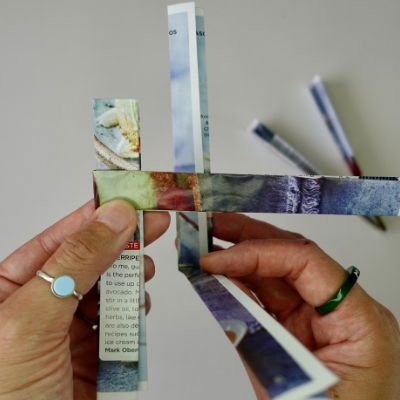
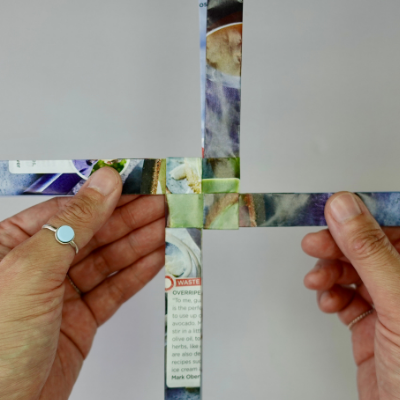
Part 1: Make the body of the star
Step 1: Fold each of your folded 4 strands in half and crease in the middle.
Step 2: Keep 2 folded of these strands on the table in front of you.
Step 3: Hold a folded loop in each hand with the ends near your pinkie finger and slide the right loop (2nd strand) over the left loop (1st strand).
Pull the right strand down about 5cm or the length of your thumb
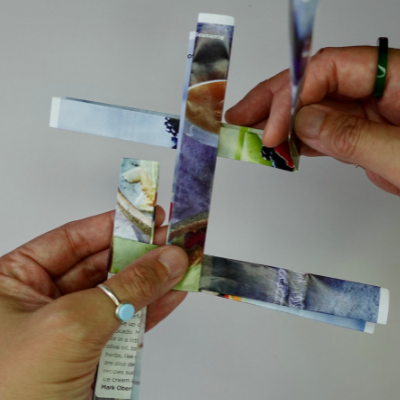
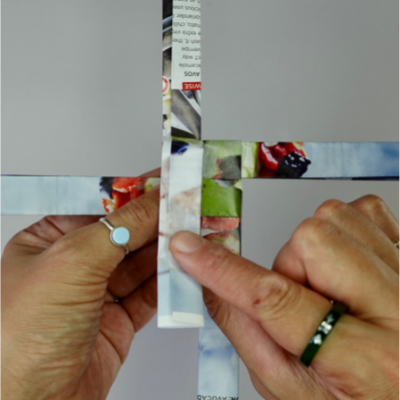
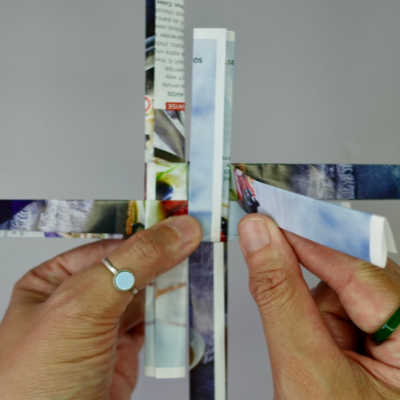
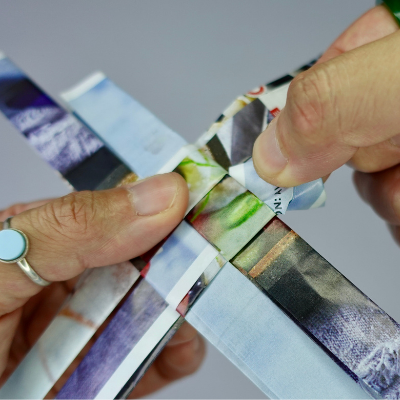
Step 4: Take a 3rd folded strand and wrap around the bottom part of the 2nd strand.
Step 5 (a) Wrap the 4th strand around the 3rd.
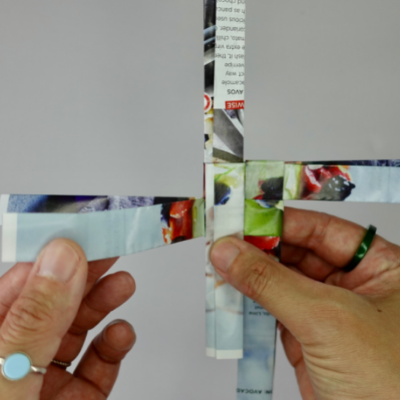
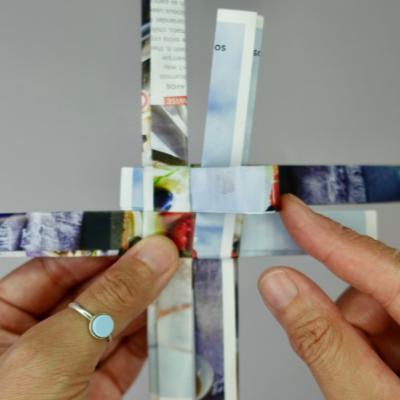
Step 5 (b) Carefully thread the ends through the loop on the left.
Step 5 (c) Gently pull strands through and tighten your square.
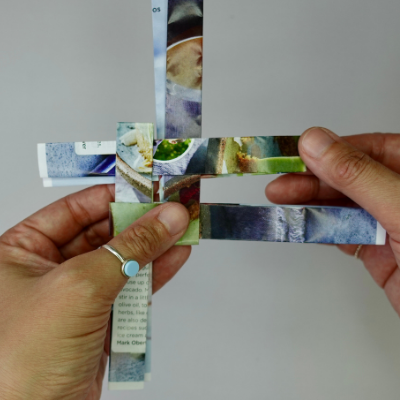
Step 5 (a): Take the last folded strand and wrap around the 3rd strand.
Step 5 (b) Pass the 2 ends of the 4th strand through the loop of the first strand.
Step 5 (c) Gently pull each of the 4 folded strands so that you make a square shape in the centre.
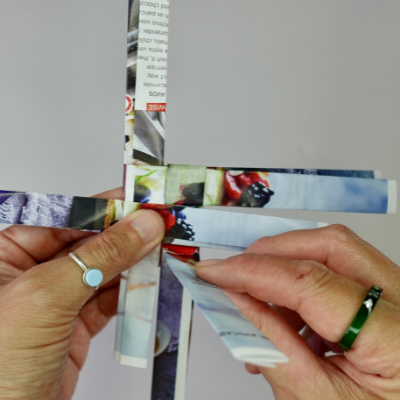
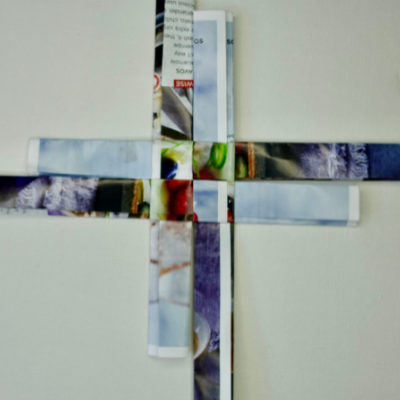
Ensure that all strands are tucked into each pocket and none are loose. If there is a loose strand, simply weave it back into the pocket where its other strand is.
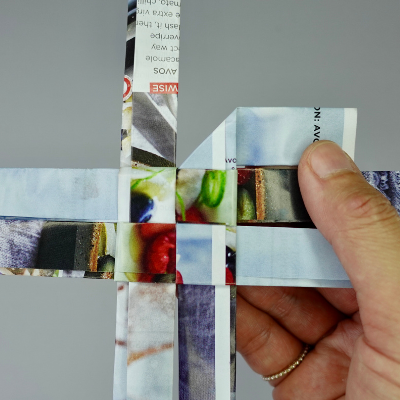
Step 6: Flip the square over onto the table in front of you. You should have a strand coming out of the top left side of your square. If you don’t, then flip it over so that you are on this side.
Step 6 & 7. After you’ve flipped your square over, fold the top 1 strand down and crease.
Step 8. Take the strand on the left and fold over to the right.
Step 9. Fold the bottom right strand up to the top.
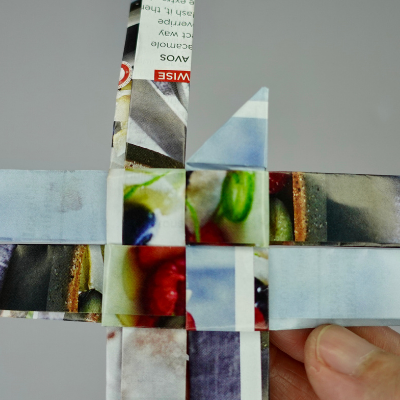
Step 7: Place the square in front of you like a + or t shape. Starting with the strands at the top, take the top strand (you’ll find 2) and fold the 1 strand down and crease into place.
Step 8: Going in an anti-clock wise direction, take the top strand on the left and fold it over the ribbon you just folded down. Fold it over to the right and crease.
Step 9: Take the top strand on the bottom right and fold up over the strand before and crease into place.
Ste 10 (a) Carefully thread the last 4th strand into the pocket on the left.
Step 10 (b) Carefully pull this strand all the through to the left.
10 (c) Crease your star flat and prepare to make your first point.
Step 10 (a) Take the last strand on the top right and pass over the 3rd strand before and tuck under the pocket on the top right.
10 (b) & (c) Pull all the way through and then crease flat.
Now it’s time to fold your first 4 points, using the shorter strands.
Part 2: Make the first 4 points of your star
Step 1. Make your first point using the top right strand.
Step 2. Make a large triangle with a tiny gap in the middle.
Step 3: Fold the right half of the triangle over the left.
First point:
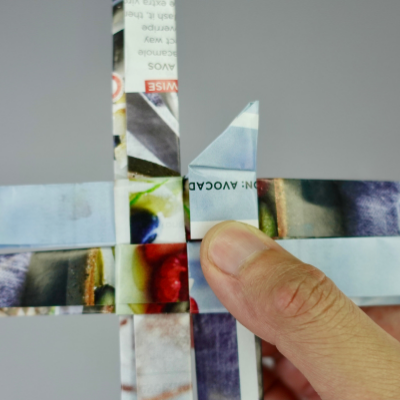
Step 1: Taking the top right strand, fold backwards or under to make a right-angled triangle and crease into place.
Step 2: Take that same strand that you wove under and to the right, and fold it forward and down to make a bigger triangle, leaving a tiny gap in the middle.
Step 3: Fold the right half of the triangle over the left to make a right angle triangle shape again. The tiny gap in the middle allows you to make a nice sharp point.
Step 4 (a) Gently thread the end of the paper strip through the pocket underneath.
Step 4 (b) Carefully pull the end through and cut away the end.
Second point: Spin your star around and repeat steps 1 – 4 on every second strand.
Step 4 (a): Gently thread the end of the paper strip from the point into the pocket directly underneath.
Step 4 (b): Carefully pull the end of the strip through and cut away the end with some sharp scissors.
Time to make your 2nd, 3rd & 4th point
Step 5: Spin your star around and repeat steps 1 – 4 on every second strand:
Ie. Fold the strand fold backwards or under to make a right angled triangle and crease into place.
Second point. Step 5: Make your second point by following steps 1 – 4.
Take your time securing your point so that the paper doesn’t tear.
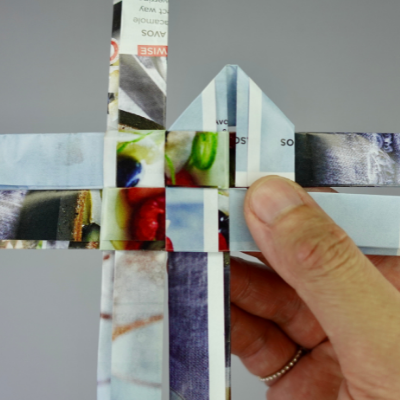
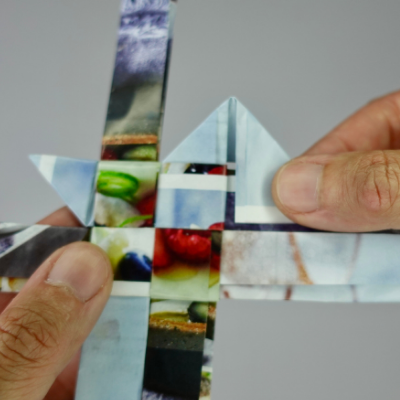
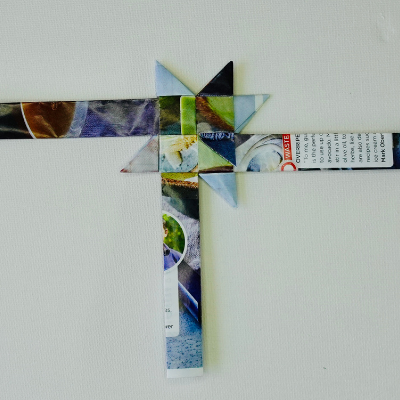
Step 6: Spin your star aroujd and make your 3rd point. This image shows that you have one more point to make on this side, your 4th point.
Next, take that same strand that you wove under and to the right, and fold it forward and down to make a bigger triangle, leaving a tiny gap in the middle.
Then, fold the right half of the triangle over the left to make a right angle triangle shape again.
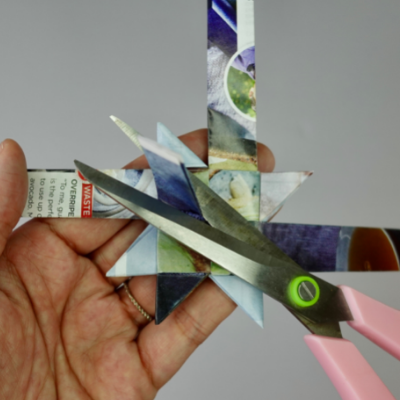
Secure this point by passing the end of the strand into the pocket directly underneath and carefully cut away the end with some sharp scissors.
Step 6: Weave your 3rd point. Count 2 strands over and weave your 3rd point – remember, it should be on the right hand side of the square.
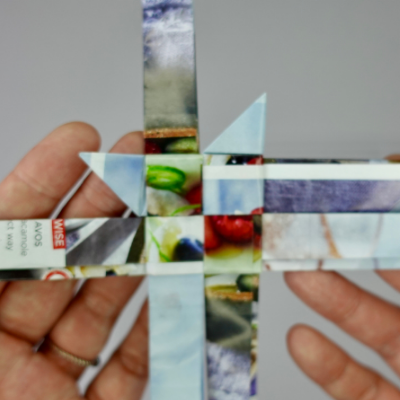
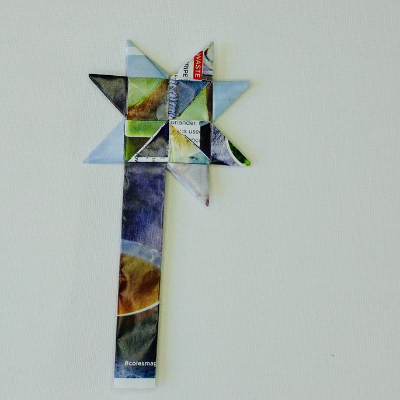
Complete you last point. You have 4 points on this side of your star.
Make the last 4 points of your star
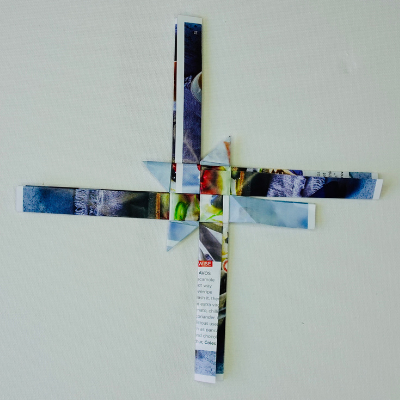
Flip your star over and complete your last 4 points.
The strands are longer on the second side. Carefully cut the ends away.
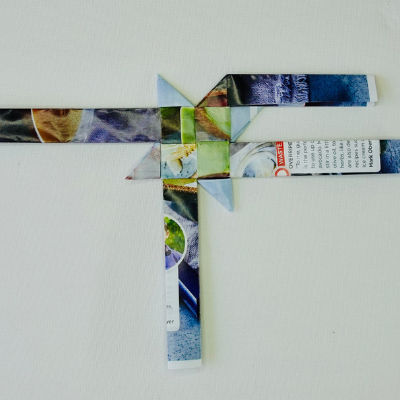
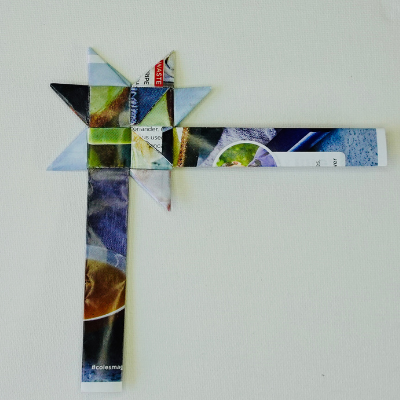
Spin your star around and complete the next point.
Once you’ve completed the first 4 points, simply flip your star over and repeat steps 1-4.
It doesn’t matter which strand you work with, just pick one and turn all remaining strands into points.
Go ahead and try another star. Remember, it will take between 3 – 5 stars to really get the star weave memorised
2 more points to go.
You can cut your ends however you like. I like to cut on the angle.
Done! Your completed star from a magazine will measure about 7cm x 7cm.
People also ask:
Is star weaving suitable for beginners?
Star weaving is suitable for ages 8 years and up, however, we’ve had some 6 year old’s take to star weaving like it was second nature.
We call this a medium weaving technique and is great for those who have some weaving, crochet or knitting experience.
It takes some time to get used to holding the materials, and remembering which direction to fold your strands, but once you’ve woven a few stars, it gets easier, we promise.
For children under 8 years old, we recommend having an adult weave with them so that they can work together.
Usually, the adult will lead and make the square body, which is the first part of the star.
You can engage the young child by asking them to pick which 2 colour strands to use first and then to pick the subsequent strands.
You can also make the folds first and then get them to press down to crease as you go along.
Can boys and weave stars, or is star weaving just for girls & women?
Absolutely!
EVERYONE is encouraged to participate. How ever you choose to identify, you are welcome to learn and weave a star with us.
What other materials can I use to weave a star?
You can weave stars using a variety of materials and many of them can be found around your home or office, like used paper catalogues or newspaper.
Many of our star weavers like to use tear or florist ribbon because they come in lots of different colours.
We love to weave stars from recycled paper because it’s a great way to re-use materials and not contribute to waste.
Sure, it takes a bit longer to cut and prepare your materials but it’s very rewarding making something beautiful from waste material.
Some of star weavers in the Cook Islands, Samoa and Aotearoa New Zealand have woven stars using dried pandanus leaves from the pandanus tree, coconut palm leaves or harakeke (flax) from the flax plant.
Whatever material you choose to weave your star with, you need 4 even strands, at least 2cm wide and 30cm long for your first star.
We have received woven stars from communities around the world in all different sizes, the smallest being the size of an Australian 5 cent coin and the largest being 30cm wide.
The general rule is, the large the star, the wider and longer the ribbon will be.
For the 5 cent coin star, the each strand was 5mm wide and 10cm long.
How long will it take to weave a star?
For your first star, it can take anywhere between 5 and 10 minutes.
When you’re learning something new, it can take up to 5 times longer than if you were doing something that you were confident at doing.
Remember, the whole point of weaving these stars is for it to be a mindful and peace filled activity.
It might not feel that way at first while you’re trying to remember all the steps, but with this guide, we hope you can pick this technique up super fast, memorise it for life and share it with others.
How many times should I weave a star to memorise it?
We recommend weaving 5 – 10 stars to really get the hang of it.
Many new star weavers will make several star bodies (Phase 1) because this is the most complex part of the star.
Making a bundle of star square bodies is also great to help children under 10 get started on star weaving.
The points are pretty straight forward so it’s a great way to engage children in the project with little difficulty.
Star weaving makes a great lunch time activity in the workplace or staff room. Many of our star weavers marvel at how quickly an hour can go by, after weaving a few stars.
Once you get started, it’s easy to keep weaving for hours!
Where does the woven star come from?
The 8 pointed woven star comes from many Indigenous and Pacific Island cultures, including Samoa, the Torres Strait Islands and Aotearoa New Zealand and is often made with natural fibres and leaves.
A variation of this woven star is also found in Denmark, Germany and Hungary and is used to decorate homes and Christmas trees.
What does the 8 pointed star represent?
The 8 pointed star, also known as an octagram, has been adopted by several cultures around the world, each giving the star its own special meanings.
These cultures include Buddhism, Hinduism, Gnostics, Judeo-Christian, Egyptian, Babylonian, Wiccans and Native Americans.
The star’s origins form part of early astronomy, where the 8 lines signify the four corners of space (south, north, east and west) and time (two equinoxes and two solstices).
For the One Billion Stars project, the 8 pointed star is a symbol of light, courage, hope and solidarity to end all forms of violence, including violence against women, bullying and racism.